Nexgrill
Griddles

Nexgrill Daytona Pro 5-Burner Assembly Instructions: Build the Nitroguard Griddle, Not a Grill

A two-person flat-top build plan for the Daytona Pro 5-burner Nitroguard propane griddle, from cart frame to plate lift, leak test, burn-off, and first seasoning.
6 min read
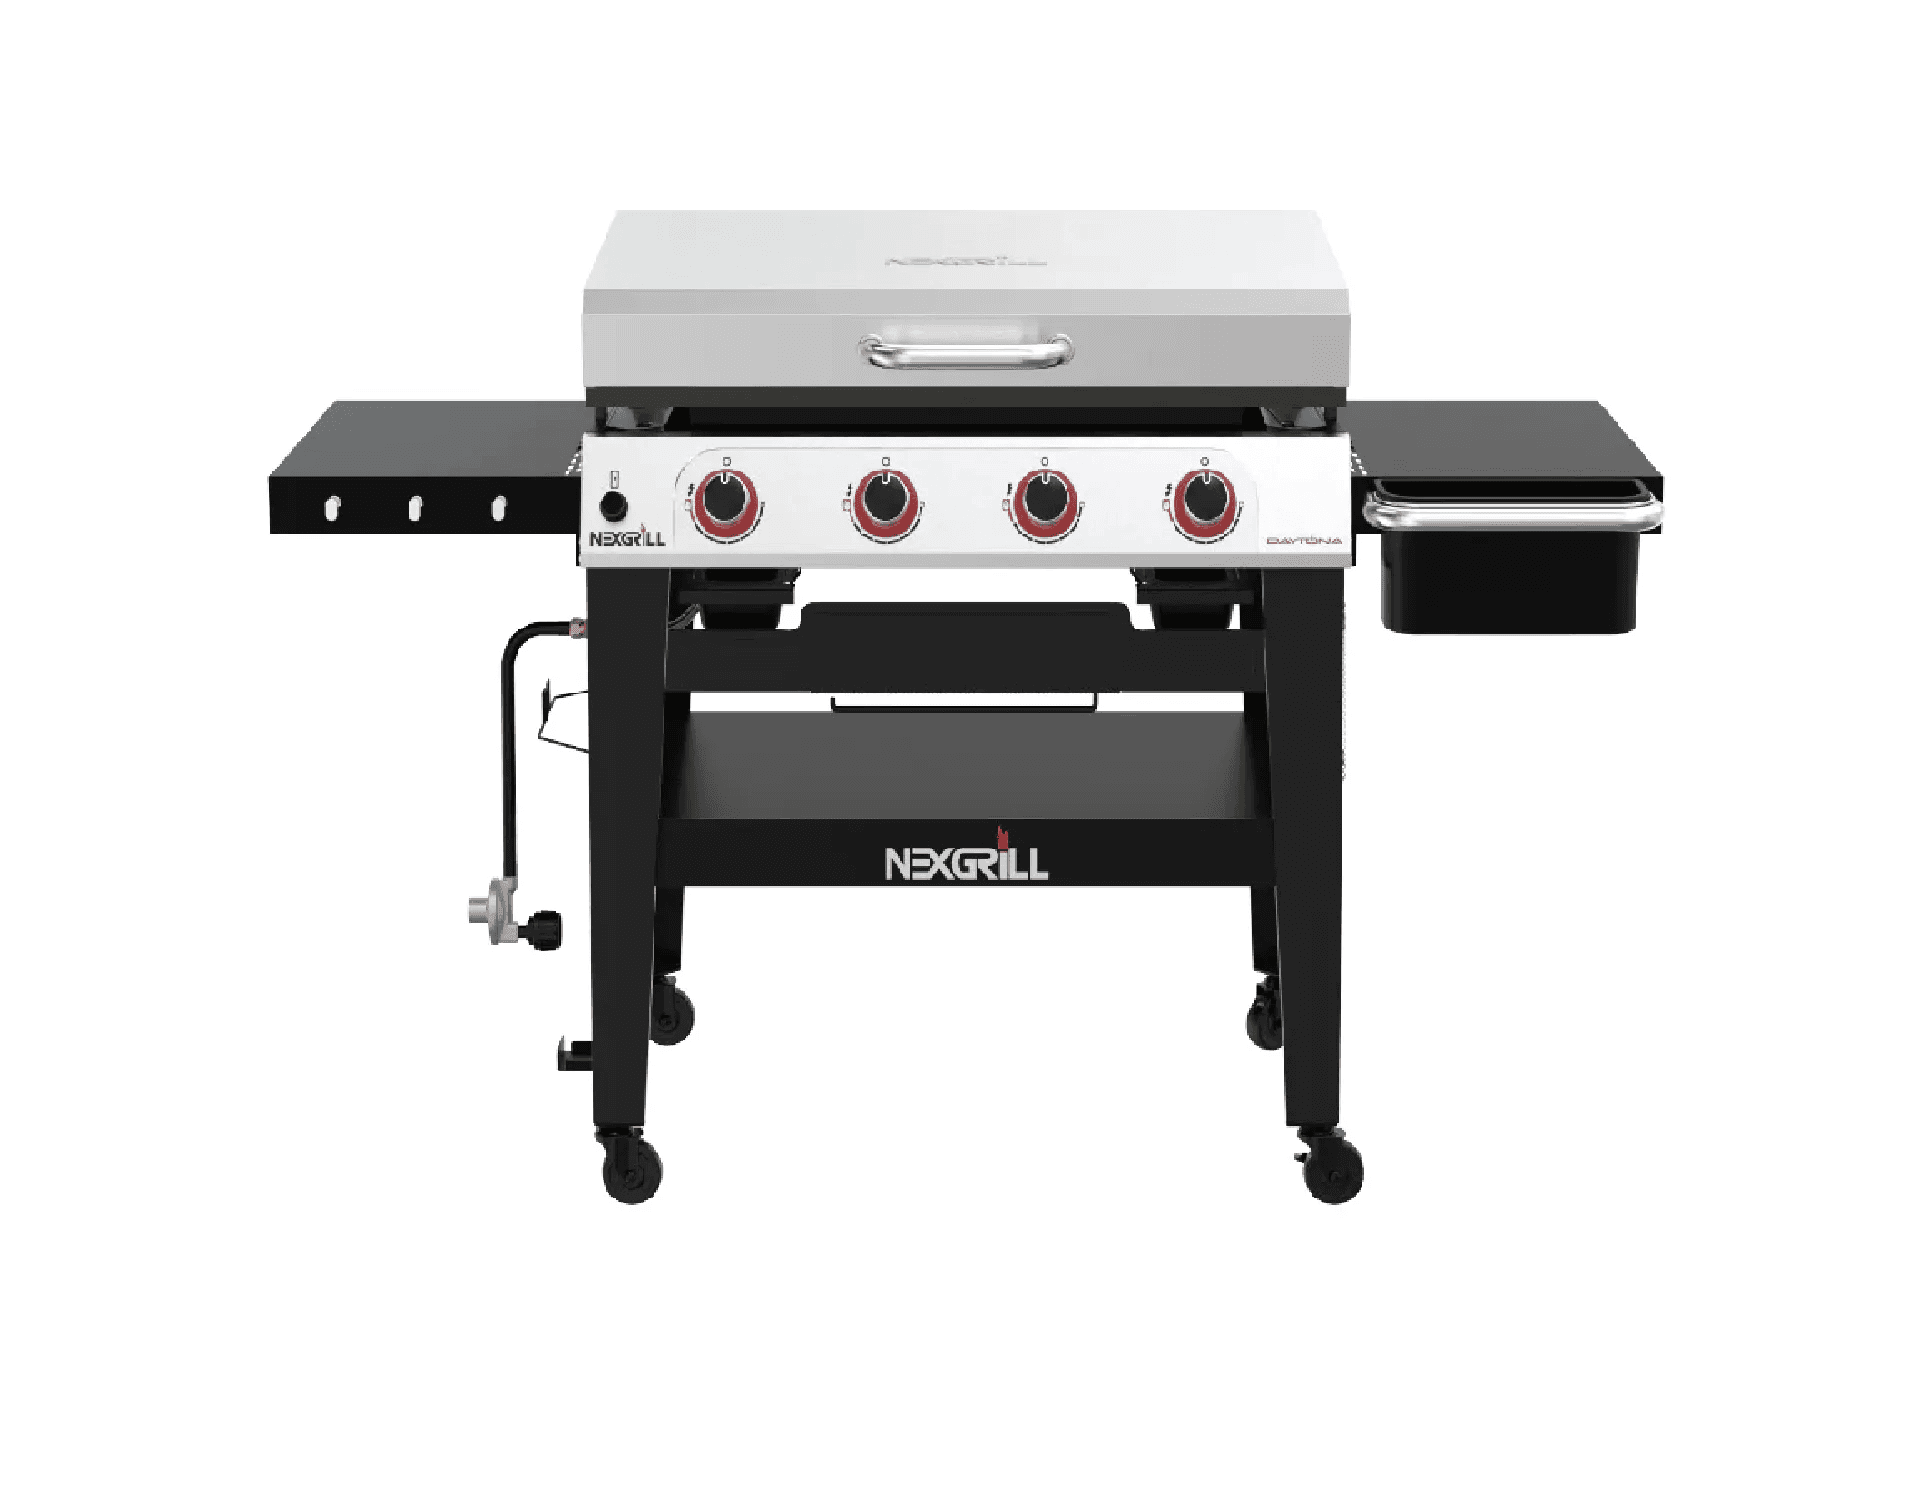
Nexgrill Daytona Pro 5 Burner Nitroguard Propane Gas Griddle

In This Article

Build Order Is Inverted

Cart frame and plumbing go up first; the heavy griddle plate lifts on last.

Budget 60-120 Minutes

Two adults, a level patio, and a 20 lb LP tank that ships separately.

Season Before You Cook

Wash, burn off factory oils, then lightly oil the Nitroguard plate.

You Bought a Griddle, Not a Grill: Why This Build Runs in Reverse

The Daytona Pro 5-Burner Nitroguard propane griddle is built for fast weeknight dinners: smash burgers, breakfast-for-dinner, bacon that never falls through a grate. But assembly does not work like a cart grill. On a typical Nexgrill gas grill, burner tubes get aligned over the valve orifices before the firebox is seated. A flat-top is different: the cart and regulator plumbing go together while the unit is still light, and the single heavy griddle plate lifts on last, by two people, once everything below it is done. Build it in grill order and you will lift a steel slab twice, alone, over freshly tightened hardware.

The plate is the last component installed, not the first. Every step before it exists to make that final lift easy and level.

What Has to Be True Before You Cut the Tape

Two adults, one level area of roughly six by eight feet, and the model-specific manual from the carton. Have on hand:

  • Phillips #2 and a flathead screwdriver
  • 7/16 in and 1/2 in wrenches or a socket set
  • A box cutter and flattened cardboard to protect the plate
  • A garden hose and dish soap for the leak test
  • A 20 lb LP tank, sold separately

Confirm your cooking surface, burner count, and dimensions against the live spec panel on the Daytona Pro 5-Burner Nitroguard product page rather than a marketplace listing, since specs can differ between revisions.

How Long Does the Daytona Pro 5-Burner Take to Assemble?

Plan on 60 to 120 minutes for two people. A five-burner cart grill like the Gourmet Pro often runs longer because each burner tube must seat over its valve orifice and the ignition collector wire must be routed off the firebox edge. A griddle skips that alignment, so the time goes into the cart and the plate lift instead.

2 people

Minimum for the plate lift; one person for the cart and plumbing

Step 1: Stage Hardware by Build Step and Separate Out the Plate

Inventory against the parts list first. Sort bolts and washers into cups by the order you will use them, not by bag colour. Set the Nitroguard plate aside on the cardboard.

Step 2: Build the Cart, Casters, and Fold-Down Shelves While It Is Still Light

Lock casters, then attach legs and lower frame. Add side shelves and confirm any fold-down latch moves freely. Keep screws snug, not crushed.

Step 3: Mount the Lid or Hard Cover and Set the Firebox on the Cart

Fit hinge hardware and test lid travel. Lift the empty firebox onto the cart rails, still light enough for one person.

Step 4: Connect the Regulator to the Manifold and Route the Hose Clear of Heat

Thread the regulator onto the manifold, then route the hose under the shelf and away from hot surfaces. Do not hang it where a hot grease cup can contact it.

Step 5: The Heavy Lift, Setting the Nitroguard Plate With Two People

One person at each end, lift from the short sides, and set the plate evenly into the frame. Confirm it seats flat with no rocking before you release it.

Step 6: Fit the Grease Cup and Drain Before Anything Cooks

Slide the cup into its bracket, confirm the drain opening is unobstructed, then proceed to the leak test.

Two Griddle Sizes Worth Weighing Before You Commit to Five Burners

For two people and a weeknight, the Stainless Steel Daytona 4-burner flat top or the Daytona 2-Burner with foldable cart may suit better, with a lighter plate that is easier to handle.

After the Comparison: The Steps Most Builds Get Wrong

Assembly usually goes fine. What goes wrong is the handful of steps people skip because they are eager to cook. These four account for nearly every complaint.

Mistake 1: Lifting the Plate Alone, and What Warping Costs You

Flat steel that gets twisted on the way in can develop a high spot, the one corner where pancakes run and burgers scorch. Get a second person, lift from the short edges, and set it down level. If you cannot find a helper, Home Depot, Nexgrill's primary retail partner, sometimes offers assembly service at checkout, worth pricing before you commit.

Mistake 2: Cooking Before the Burn-Off

Factory oils and machining residue sit on the plate out of the box. Run all burners on high for about 15 minutes with the lid open and nothing on the surface, then let it cool before wiping.

Mistake 3: Forgetting the Grease Cup and Over-Tightening the Regulator

First-cook spills land on the patio when the cup is missing or seated crooked. Hand-tighten the regulator coupling by the nut, never by twisting the hose or body. Cross-threading here is a leak you will smell before you see.

Mistake 4: Over-Oiling During Seasoning

A thick coat of oil polymerises into a sticky film that grabs food. Wipe it on thin enough that the surface looks dry, heat it, repeat twice. Use a high-smoke-point oil.

How to Season the Nitroguard Plate Without a Gummy Surface

Wash the plate, dry it fully, complete the burn-off, then apply thin coats of oil with a paper towel held in tongs. Let the plate cool between coats and wipe off pooled oil before the next round. The finish is Nexgrill's proprietary griddle-plate coating, so treat it like carbon steel, not a nonstick pan.

The Leak Test, Step by Step, at Both Connections

Check PointWhat to DoPass Looks Like
Tank-to-regulatorBrush soapy water, valve openNo growing bubbles or hiss
Regulator-to-manifoldSoap solution on the jointSteady, silent joint

Never test a connection with a flame. If bubbles form, close the tank valve, reseat the coupling, and retest. See the NFPA grilling safety guidance.

When to Stop and Call Nexgrill Support Instead of Forcing a Part

If a bracket is bent, a thread is stripped, or the plate will not seat flat, stop. Forcing hardware strips threads and voids your options. Contact support through Nexgrill's contact page with your model number and a photo of the part.

Which Buyer Are You: First Flat-Top or Adding to the Lineup?

First-time flat-top owners should stop at the plate lift and use two people every time. Owners adding a griddle to an existing gas grill lineup can treat the five-burner as a second station and prioritise shelf space and storage over raw surface area.

A Short Post-Assembly Checklist for the First Week

  • Leak test repeated once after the first full day of use
  • Grease cup checked after every cook
  • Thin oil coat wiped on after each cleaning
  • Cover fitted when the unit cools, to keep the plate off rain
Sources

Why Choose Us

Here's what sets us apart

  • Premium grilling experience at accessible pricing

    We position ourselves as delivering high-end outdoor cooking features and performance without premium-brand pricing, emphasizing “Quality Grills. Unbelievable Value.”

  • Wide range of outdoor cooking products for every use case

    We offer gas grills, pellet grills, griddles, smokers, pizza ovens, portable/tabletop grills, electric grills, accessories, and replacement parts — allowing customers to stay within one ecosystem for all outdoor cooking needs.

  • Innovation-focused outdoor cooking with smart technology

    We differentiate ourselves through smart grilling products like the Oakford smart pellet grill, including app-connected cooking controls and modern outdoor cooking technology.

What Our Clients Say

Don't just take our word for it

“I’ve been using the Nexgrill Daytona 4-Burner Gas Griddle for a while now, and I’ve been really happy with it. First off, it’s super sturdy and feels really well-made, like it’s going to last me a long time. The cooking space is awesome—plenty of room for making big meals. So far I’ve cooked pancakes, burgers, bacon and some veggies. The 4 burners make it easy to control the heat in different areas. I love that I can keep one side hotter for searing and leave the other side cooler for things that don’t need as much heat. Plus, it heats evenly, which I was really glad to see. The shelves underneath and on its sides are a nice bonus. I’ve used them to keep things like plates, tools, and ingredients handy while I’m cooking, it’s very convenient. Cleaning it is super simple too. Once it cools down, I just wipe off the cooking surface and let the grease funnel into the trap. It’s quick and easy, and honestly, it barely looks like I even used it. If I had to nitpick, the grease trap can fill up kind of quickly during bigger cooking sessions, but as long as you keep an eye on it, it’s not a big deal. Overall, this griddle has been great. It’s sturdy, easy to use, and makes cooking outside a lot of fun. If you’re into grilling or want something versatile, I think this is a solid choice. Originally posted on influenster.com”

M
martind23_2941
Sturdy, easy to use, and perfect for cooking big m

“took about 2-3 hrs for complete assembly. took about 15-20 minutes to fully heat to 700. used a pan liner and a drip cup liner due to previous issues with those rusting away. this is about the 3-4 grill i have assembled. dont try to do it alone or ask the wife for help with the firebox its awkward. always check the directions 2-3 times before tightening down and dont over tighten the screws. hopeing for 5 years of grilling on this but i havent checked the warrenty yet.”

DT
Dave the Griller
finally got around to building this.bought in 2025

“We just bought this guy and I recommend always buy it assembled, we just use the grill 2 times and really works good; is perfect size and the side burn is very useful plus the caddy attach for spices; the material quality is in medium rate; no too cheap no too expensive I'll be glad if it works for minimum 5 years. Nexgrill could improve with the way, and cleaners to not damage the grates and the burners. I protect the removable pan with heavy duty aluminum foil, when the grease drop I only change the foil. Well I am enjoying my new Nexgrill !!! P.s. always clean the grill after use it....ALWAYS :-)”

KA
Karl A
Nice Grill

“Thank you to Influencer and Nexgrill for sending this to me for free, in exchange for my honest opinion. My 17 year old son put this together for me. It was easy but time consuming, it took about 2 hours. This is great for families, because you can cook a good amount of food in a short time. We did tacos, but it’s also great for breakfast, pancakes, eggs, breakfast burritos. It’s easy to clean if you have the right tools, you’ll need a scraper and metal spatula. Overall I would recommend this flat grill, it’s a great addition to our household. Originally posted on influenster.com”

K
KellyL
Quick and easy cooking

“My old Nexgrill is 25 years old and still looking and performing well! This new one is going on our back patio to partner with the old one in our courtyard. Obviously quality products to last that long. I hope the new one does as well. The only concern I have is that the sides are painted metal rather than stainless like the old one. I hope it doesn’t rust over time. But, We are very happy grillers!”

JS
Judy S
New grill to partner with my old one

“Bought grill 3 years ago stainless grates rusted out had to order new ones to replace Yes, I recommend this product.”

G
GaryS329
Stainless

“I’ve always been a smoker, fryer kind of guy. But recently with my new job keeping me super busy I’ve been cooking on my father in-laws 2 burner grill and it takes so long to cook ribs and chicken. I love just lighting the burners and cooking so I decided to upgrade by buying my own and I got this 5 burner with side burner for veggies , took me maybe 20 minutes to get all the dinner done tonight after I seasoned the grill with an onion. Love it so far, I hope it lasts a long time! It’s beautiful!”

JB
Jason B
Love it so far! My first propane grill I’ve ever bought myself!

“I love your grills. This is a replacement grill for a fully stainless steel one (was suppose to be). We originally bought it for our daughter's new townhouse, but her patio was not "ready" for it. We have kept it for 5 years now. My husband passed, I sold the house and move it, in the original box, with me and just put it together. The”

LG
Lisa G
Replacement

“Purchased a 5 burner with side burner grill probably 7-8 years ago. You can only replace things for so long. Opted on a smaller 4 burner grill this time. Hoping to get lots of use for many years to come.”

BS
Brian S
2nd grill with out

“Easy grill to use & grills well. Last grill lasted a little over 6 years. Had to replace burners twice (just worn out - lots of use). Here is old grill & new grill.”

RE
Russell E
2nd Nexgrill

“I had either recieved or bought a grill from either webber or Charbroil. Both had lasted roughly 5 years each before rusting out. For the price point and the way this grill feels I think this one should last longer. Looks awsome new so hopes are high.”

VA
Victor A
3rd grill so far...

“I’m just setting up my second 5 burner nexgrill!!! My first one was purchased in 2015!! I live in New England and the grill lived outside for 7 1/2 years!! That is an impressive lifespan for a grill in my area! I’ll be a loyal Nexgrill customer for life. Thanks very much. Yes, I recommend this product.”

L
Litch
Robust grill with Longevity to boot

“This grill is good for an economy grill. My 10 year old assembled most of it. I knew that I was getting a budget grill and didn't expect a Cadillac. I bought it mainly because the burners have flame on the left and right, instead of one row on the top. I checked the temperature gauge vs my digital and it runs 50° high, didn't expect it to be right on. The burner tents are higher in the front, making it hotter in the front. I have snips so I'll cut the front to set level. I seasoned the grill with bacon, it leaked from the screw to the drip pan, which was tight. The corners are sharp. I had corner protectors for my smoker and put some on the Nexgrill, hoping to get more life from the cover. Overall it's pretty good for the price.”

DK
Daniel K
Easy to assemble
4.7/ 5
13 reviews

Keep reading

Related Articles

Nexgrill Stainless Steel Daytona 4-burner flat top griddle grillGriddles

Nexgrill Daytona 2-Burner Assembly Instructions: Flat-Top Build, Lid Alignment, and Leak-Test Steps

Which Daytona 2-Burner Do You Actually Own? A Four-Way Fork Nexgrill uses “Daytona” across several 2-burner products, and they do not share a build sequence. Match your carton to one of these four before opening the hardware bags: Daytona 2-Burner Propane Gas Griddle with Lid - flat-top plate plus a hinged lid, typically on a fixed cart. Daytona 2-Burner Propane Gas Griddle with Foldable Cart - flat-top plate, no lid, legs that collapse for storage. Deluxe 2-Burner Gas Grill - open-grate gas grill with a firebox and lid, not a griddle plate. Daytona Pro 5-Burner Nitroguard Griddle - a five-burner unit; if your box says “Pro 5” or “Nitroguard,” use that manual instead. The model number is on a silver label inside the carton and on the rear of the cart frame. If the label is missing, the lid (present or absent) and the cart style (fixed vs. folding) are your fastest clues. Do not start with the griddle plate on any model. The grease trough and heat tents must be seated underneath first, or you will lift the heavy plate back out. What Should Be Unfolded on the Patio Before You Cut the Tape? Clear a flat 8 ft × 8 ft area - the foldable-cart unit needs room to open its legs without scratching the deck. You will need a #2 Phillips screwdriver, a 7/16 in. wrench or adjustable spanner, and a box cutter. A second person is strongly recommended for the lidded griddle (45-90 minutes with a helper) but is optional for the foldable-cart version (30-60 minutes solo). Have a 1 lb propane cylinder or your bulk tank ready only for the final leak test, not for the build itself. How Long Does a Daytona 2-Burner Build Really Take? Model Typical time Helper Hardest step Lidded griddle 45-90 min Recommended Lid hinge alignment Foldable-cart griddle 30-60 min Optional Leg-lock click test Deluxe 2-burner gas grill 45-75 min Optional Burner tube screw seating Where the Flat-Top Build Order Differs from a Cart Gas Grill On a standard cart gas grill, the firebox goes on the cart first, then burner tubes, then grates. On a Daytona flat-top, the cart still comes first, but the sequence above the cart flips: the grease trough and heat tents drop into the base before the griddle plate. That single change prevents the most common rework - lifting a 30-40 lb plate to retrieve a trough you forgot to install. Step 1: Unpack, Inspect, and Sort Hardware by Assembly Step Lay every part on cardboard. Count legs, casters, the regulator/hose, and the griddle plate against the parts list. Sort screws into cups labelled “Step 2 - frame,” “Step 3 - regulator,” “Step 4 - trough,” and “Step 6 - burner.” Sorting by step, not by bag colour, eliminates the mid-build search that adds 10-15 minutes. Step 2: Frame First-Legs, Casters, or Foldable Cart Latch Check Fixed-cart units: bolt legs to the cart base, then attach casters with locking casters at the front. Foldable-cart griddle: open the cart until both leg locks click audibly; push down on the frame to confirm no wobble before flipping it upright. A leg that does not click is not locked - do not proceed. Step 3: Regulator Hose Routing and Valve Orifice Seating Thread the regulator collar onto the tank valve by hand until snug - never use a wrench; over-tightening deforms the rubber seal and causes leaks. Route the hose so it does not touch the firebox bottom or cross a burner tube. On the Deluxe 2-burner gas grill, check that each burner tube slides fully over its valve orifice before tightening the retaining screw. Try comparing two Daytona models side by side below to see which fits best:

Nov 5, 20266 min read
Read more
Nexgrill Daytona Pro 5 Burner Nitroguard Propane Gas GriddleGriddles

Nexgrill Daytona Pro 5-Burner Review: How to Run It Like a Pro (Setup, Zone Cooking & Mistakes)

What This Nexgrill Daytona Pro 5-Burner Review Covers (and What It Doesn't) Most flat-top reviews stop at the unboxing. This one assumes you already bought the grill - or are close - and want to run the Daytona Pro 5-burner like a short-order cook: setup done right, the plate seasoned so food releases cleanly, and each of the five burners mapped to a job. What we deliberately do not print: BTU counts, square-inch figures, plate thickness, or a fixed price. Those numbers change by listing and season. Confirm current figures on the live Nexgrill product listing or the Home Depot product page before you commit. This guide is about operation - heat control, consistency, cleaning effort, and whether five burners earns its footprint in your backyard. Before Your First Cook: Propane, Leak Check, and Level Placement A wide flat-top is heavy and top-heavy once a full propane tank hangs on the cart. Place it on a hard, level surface - a sloped deck sends grease toward one corner of the plate and pools it there. Tighten every cart bolt before the first cook. Then do a soapy-water leak test on every connection: tank valve, regulator, and manifold. Open the tank slowly, brush the joints, and watch for bubbles. Never test with a flame. Keep the lid open when lighting. Skip the leak test and you're trusting a factory seal on your first cook. It takes two minutes and costs nothing. Step-by-Step: Seasoning the Flat-Top Plate Without Flaking The most common seasoning failure is applying too much oil at once, which bakes into a gummy, flaking layer instead of a bonded patina. The fix is thin coats, repeated. Wipe the cold plate with warm soapy water and dry it completely - factory residue blocks bonding. Light all burners on low to warm the plate, then cut heat. Apply a thin film of high-smoke-point oil (canola, flaxseed, or grapeseed) with a paper towel or lint-free cloth. Bring all burners to medium-high until the oil just begins to smoke, then cut heat. Add a second thin coat once the plate cools slightly, and repeat for three to five coats. Wipe off excess oil and let the plate cool fully before your first cook. If the surface feels tacky rather than slick afterward, you used too much oil - scrub back to bare metal and start again. Mapping the Five Burners: A Real Family Cook from Sear to Warm Five burners only pay off if you assign each one a job. Left-to-right heat control lets you sear, finish, and hold simultaneously - the entire argument for a wide plate over a two-burner model. Zone (left to right) Heat setting Job in a family cook Burner 1 High Sear and crust Burner 2 Medium-high Finish proteins Burner 3 Medium Vegetables and onions Burner 4 Low Eggs, pancakes, delicate food Burner 5 Low/off Hold finished food warm Give the plate five to ten minutes to stabilize after changing heat. Flat-tops respond slowly - chasing temperature with the knobs only overshoots. Sear, Hold, Serve: A Smash-Burger Walkthrough on a 5-Burner Plate Press a ball of beef onto the hot left zone, smash it once, and leave it alone until the crust forms - the plate does the work. Slide it to zone two to finish, stack cheese, then move it to the far-right hold zone while you cook the next round. On a wide plate you can run a dozen burgers without ever serving a cold one.

Oct 30, 20265 min read
Read more
Nexgrill Stainless Steel Daytona 4-burner flat top griddle grillGriddles

Nexgrill Daytona 3-Burner Assembly Instructions: Build Order, Bolt Traps, and First-Season Checklist

You Have a Daytona Box, Three Knobs on the Carton, and No Clear Booklet The carton arrived and there's no obvious instruction booklet. Before you grab a socket set, pause: the current Nexgrill Daytona family is easy to misread, and building the wrong configuration wastes an afternoon. This walkthrough is for owners who need a practical build order, not a generic leaflet. The 60-Second ID Check: Does a 3-Burner Daytona Actually Exist? Nexgrill's live catalogue lists Daytona models as 2-burner griddles, 4-burner propane griddles, a stainless 4-burner flat-top, and a Pro 5-burner Nitroguard. There is no current "Daytona 3-burner" SKU. Your unit is likely an older discontinued Daytona 3-burner gas grill, a mislabelled 2- or 4-burner Daytona griddle, or a 3-burner grill from another Nexgrill family. Count the knobs: three main burner knobs plus an igniter and no side burner means a 3-burner gas grill. A continuous flat steel plate means a griddle. Find the rating label (back panel, inside the cabinet, or under a side shelf) and photograph the SKU and serial number. Cross-check the carton GTIN against the product page. A 4-burner firebox and a 3-burner firebox have different bolt patterns. Warning: No direct 3-burner Daytona assembly PDF exists on the current Nexgrill site. Use the model-specific document linked from your product page or the retailer's "Info & Guides" tab. If neither lists your exact SKU, contact support before assembly. Before You Open the Hardware Blister Pack: Lay Out the Parts List Empty the carton onto a blanket and compare every panel, leg, castor, shelf, and heat tent to the parts list. The most common trap is a blister pack mixing M6 and M8 bolts in similar lengths. Sort them into labelled cups. A bolt 5 mm too long will dimple a shelf bracket or strip the weld nut inside the firebox. Tip: Photograph the laid-out hardware before you start. If you finish with two bolts left over, the photo tells you where they belong. Step-by-Step Build Order for a Daytona Cart and Firebox This reflects typical Nexgrill construction for cart-style gas grills and griddles - a guide, not a verified per-SKU manual. Build the cart upside down. Lay the top cart panel face down on a blanket and attach the legs or side frames loosely. Fit casters and bottom shelf before flipping. Locking casters go on the front legs; bolt the shelf while the frame is inverted. Flip the cart with two people. A 3-burner gas body is well over 50 lb. Mount the firebox last. With the cart upright and level, lower it onto the rails and start all four bolts by hand before tightening. Attach side shelves and lid handle. Use the shorter bolts for shelf brackets. Drop in burners, heat tents, and grates or griddle plate. A flat-top plate goes on last and is heavy - get help. Connect the regulator and LP tank, then leak-test. Soapy water at both regulator joints; never a flame. Where the Assembly Sequence Usually Goes Wrong Mixing M6 and M8 bolts. A thread mismatch can cross-thread a weld nut. Mounting the firebox before casters. You cannot reach the castor bolts once the body is on. Skipping the flat-top seasoning. Bare cold-rolled steel will rust and stick without an oil-and-heat cycle. Skipping the leak test. Two minutes at both regulator joints prevents a dangerous first burn. Try comparing two products side by side below to see which fits best:

Oct 28, 20266 min read
Read more
Nexgrill Stainless Steel Daytona 4-burner flat top griddle grillGriddles

Nexgrill Daytona 2-Burner Griddle Review: Season It, Run It, Keep It Cooking

Which Daytona 2-Burner Are You Actually Reading About? Search for a Nexgrill Daytona 2-burner review and you will land on two different products that share a burner count and almost nothing else. The first is the Daytona 2-Burner Propane Gas Griddle with Lid - a freestanding flat-top with a hard lid that clamshells over the cooking surface. The second is the Daytona 2-Burner Propane Gas Griddle with Foldable Cart , which trades the lid for legs that collapse. Both are flat-top griddles, not open-grate grills. If you were looking for the Fortress 2-Burner - a lidded grill with exposed grates for steaks and chicken - you are in the wrong review. The Daytona 1-Burner is the smaller sibling with a single control knob. This piece covers only the two 2-burner flat-tops, and the reason it matters is practical: the lid model and the cart model season, cook, and clean identically, but they store completely differently. That single difference decides which one a renter, a tailgater, or a couple with a small patio should buy. Nexgrill has been building outdoor cooking equipment since 1993 from its California base, and the Daytona line is its flat-top answer to the smash-burger era. The griddle plate - not the burner count - is the product here. What You Need Before the First Cook: Prerequisites and Unboxing Do not unbox onto a wooden deck and start cooking. Assemble on a flat, fire-safe surface with the propane still disconnected, because a wobbly cart and a half-seated regulator are the two things that turn a first cook into a bad memory. Have on hand: a propane tank (1 lb for short sessions or a standard 20 lb cylinder for a full season), two clean lint-free cloths, a silicone or cotton mop for oil, a metal scraper, and a bottle of high-smoke-point cooking oil - canola, avocado, grapeseed, or refined peanut all work. Nexgrill does not publish one fixed specification sheet that applies to both SKUs, and figures such as total BTU, cooking area, and unit weight are best confirmed on the live product page before you buy, because retailer listings and model years differ. The same applies to warranty: frequently a limited term, so confirm the stated term on the product page rather than trusting a marketplace summary. Prices sit in the mid-hundreds of USD depending on retailer and season - treat any single quoted number as a snapshot, not a promise. Leak-Check the Propane Hookup in Five Minutes Every new connection deserves a soapy-water test before the first ignition. Mix a teaspoon of dish soap into a cup of water, brush it over the regulator-to-tank joint and the hose-to-manifold joint, open the tank valve, and watch. Bubbles that grow mean a leak - tighten, retest, and if it persists, stop and contact the retailer. A 1 lb bottle screws straight onto the regulator; a 20 lb cylinder needs the collar seated and the coupler hand-tight only. Never use a flame to check for gas. I have watched a first-timer skip this step, cook anyway, and smell gas the whole meal. Five minutes now saves a genuinely dangerous afternoon later - and repeat the test any time you swap tanks or move the cart. Step-by-Step: Seasoning a Cold-Rolled Steel Griddle Top The griddle plate ships with a protective factory coating - usually a waxy film - and it must come off. Wipe the plate with a warm, damp cloth and a drop of mild dish soap, then dry it thoroughly. That is the only time soap touches the cooking surface. Now season: Coat thinly. Pour a teaspoon of high-smoke-point oil onto the cold plate and spread it with a cloth until it looks almost dry. If you can see pooled oil, you used too much. Heat to smoking. Light both burners on medium and let the oil smoke, then kill the heat and let the plate cool completely. Repeat two or three times. Thin coats over heat build a hard, black-brown polymer layer. Each pass should look glossier and darker than the last. Test with an egg. A properly seasoned plate slides a fried egg with almost no sticking. If it grabs, do one more thin coat. Use high-smoke-point oil, not olive oil or butter. A reader I know seasoned with extra-virgin olive oil, triggered a smoke alarm, and ended up with a tacky, sticky plate that had to be stripped and reseasoned with canola in three thin coats. Preheat, Oil, Cook: Your First Meal on Two Burners A cold-rolled steel plate takes a real 10 to 15 minutes to reach a proper cooking temperature across its full width. Light both burners, close the lid (if you have the lid model), and wait. When a drop of water skitters across the surface, you are ready. Wipe on a very thin film of oil just before the food lands, and keep it thin - a puddle of oil is a deep fryer, not a griddle. Your first cook should be forgiving: bacon, onions, or a batch of pancakes. Bacon is ideal because the fat seasons the plate further as it renders. For a Sunday breakfast of eggs, bacon, and pancakes for two, you are using only a third of the plate, and you are learning the single most valuable skill on this machine - where the hot zone ends and the holding zone begins. Two Burners, Two Zones: The Left-Sear, Right-Hold Layout This is the whole justification for two burners instead of one. Assign the left burner as your sear side and the right burner as your hold side. Smash burgers go on the left, get their crust, then slide right to finish slowly while the next patty goes down. Hash browns brown on the left; the finished eggs wait on the right at low heat. On the foldable-cart model, the same logic applies - you just gain no lid to trap heat between cooks. Zone Burner setting What goes there Sear side (left) Medium to medium-high Burgers, chops, hash browns, stir-fry vegetables Hold side (right) Low, or off after warm-through Eggs, pancakes, finished patties, tortillas Lid Model or Foldable Cart: The Trade-Off That Actually Divides These Two This is not a performance decision; it is a storage and usage decision. The lid model protects the seasoned plate from rain, dust, and neighborhood cats between cooks, which makes it the friendlier choice for a balcony or a small patio where the griddle stays outside. The foldable-cart model wins for anyone whose griddle lives in a garage or trunk: it collapses, sits low, and survives the trip to a parking lot. Neither is more of a

Oct 21, 202610 min read
Read more

Featured products

From our catalog

Stainless Steel Nexgrill Daytona™ 4-Burner Flat Top Griddle Grill
Flat Top Griddles

Nexgrill

Stainless Steel Nexgrill Daytona™ 4-Burner Flat Top Griddle Grill

Daytona™ 3-Burner Propane Gas Grill with Griddle Top in Black
Flat Top Griddles

Nexgrill

Daytona™ 3-Burner Propane Gas Grill with Griddle Top in Black

Daytona™ 3-Burner Propane Gas Grill with Griddle Top
Flat Top Griddles

Nexgrill

Daytona™ 3-Burner Propane Gas Grill with Griddle Top

Daytona™ 1-Burner Propane Gas Grill with Griddle Top
Flat Top Griddles

Nexgrill

Daytona™ 1-Burner Propane Gas Grill with Griddle Top

Nexgrill Daytona™ 4-Burner Propane Gas Grill with Griddle Top
Gas Grills

Nexgrill

Nexgrill Daytona™ 4-Burner Propane Gas Grill with Griddle Top

Daytona™ Pro 5-Burner NitroGuard™ Propane Gas Griddle
Gas Grills

Nexgrill

Daytona™ Pro 5-Burner NitroGuard™ Propane Gas Griddle

Daytona™ Griddle Scraper With Long Handle
Grill Tools

Nexgrill

Daytona™ Griddle Scraper With Long Handle

Daytona 12 in. Stainless Steel Outdoor Kitchen Griddle Dome
Grill Tools

Nexgrill

Daytona 12 in. Stainless Steel Outdoor Kitchen Griddle Dome

Nexgrill | Black Daytona™ 2-Burner Propane Gas Griddle with Lid
Gas Grills

Nexgrill

Nexgrill | Black Daytona™ 2-Burner Propane Gas Griddle with Lid

Nexgrill | Daytona™ 28" 2-Burner Gas Griddle
Gas Grills

Nexgrill

Nexgrill | Daytona™ 28" 2-Burner Gas Griddle

Nexgrill Gourmet Pro 5 Burner Dual Fuel Gas Grill with Side Burner in Graphite
Gas Grills

Nexgrill

Nexgrill Gourmet Pro 5 Burner Dual Fuel Gas Grill with Side Burner in Graphite

Fortress 2-Burner Table Top Grill
Flat Top Griddles

Nexgrill

Fortress 2-Burner Table Top Grill

Why Choose Us

Here's what sets us apart from the competition

Premium grilling experience at accessible pricing

We position ourselves as delivering high-end outdoor cooking features and performance without premium-brand pricing, emphasizing “Quality Grills. Unbelievable Value.”

Wide range of outdoor cooking products for every use case

We offer gas grills, pellet grills, griddles, smokers, pizza ovens, portable/tabletop grills, electric grills, accessories, and replacement parts — allowing customers to stay within one ecosystem for all outdoor cooking needs.

Innovation-focused outdoor cooking with smart technology

We differentiate ourselves through smart grilling products like the Oakford smart pellet grill, including app-connected cooking controls and modern outdoor cooking technology.

Browse by Category

Grills

Grills

Expert tips, buying guides, comparisons, and inspiration for choosing and getting the most out of your grill.

Troubleshooting

Troubleshooting

Practical guides for cleaning, maintenance, common grill issues, and performance optimization.

Recipes

Recipes

Step-by-step grilling recipes, cooking techniques, and meal ideas for every occasion and skill level.

Lifestyle

Lifestyle

Backyard entertaining ideas, seasonal grilling inspiration, and stories that celebrate outdoor cooking culture.

Accessories

Accessories

Helpful articles covering grilling tools, cookware, maintenance gear, and must-have accessories for outdoor cooking.

Griddles

Griddles

Find griddle recipes, cooking techniques, cleaning tips, and outdoor meal ideas designed for Nexgrill griddles.

Frequently Asked Questions

Find answers to common questions

Nexgrill griddle dimensions vary by model. Please refer to the specific product page for detailed measurements.

Nexgrill griddles are typically constructed from high-quality stainless steel and other durable materials designed for outdoor cooking.

To clean your Nexgrill griddle, make sure it is cool, then scrape off food residue with a spatula and wash the surface with warm, soapy water. Regular cleaning helps maintain performance and longevity.

Yes, Nexgrill griddles are designed for versatile cooking and are ideal for preparing breakfast foods such as pancakes, eggs, and bacon.

Yes, Nexgrill offers a warranty on their griddles. Warranty terms can vary by model, so please check the product details for specific coverage information.