Nexgrill Oakford Homestead 24 Manual: Assembly, First Burn, and Damper Guide
A charcoal-specific walkthrough for assembling, seasoning, and controlling the Oakford Homestead 24 - plus the five mistakes new owners make in the first week.
In This Article
Assembly Order That Works
First Burn Matters
Damper Control
You Have a Box of Charcoal Parts and a Name That Doesn't Match the Sticker
The first surprise most new Homestead 24 owners hit is a naming mismatch. The carton reads "Oakford Homestead 24," but the rating plate riveted to the back of the firebox may show a model number that doesn't contain the word "Oakford" at all. This is normal in the grill industry - retail names are merchandising labels, while rating plates carry manufacturing data. When you search for a manual, search the plate number, not the box slogan.
The second surprise is more practical: this is a charcoal kettle-style unit built for charcoal and charcoal only. There is no gas regulator in the box, no control knob, no igniter wire. If you're hunting for a burner tube, stop - you bought the right grill, you're just reading the wrong mental model.
Why the Oakford Homestead 24 Is a Charcoal Grill, Not a Pellet Unit
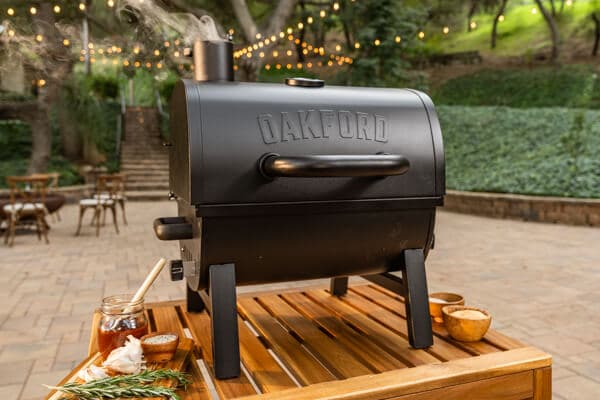
Nexgrill's Oakford line spans pellet smokers like the 875 and 1125 Pro, so it's understandable that a new owner might expect wires, a hopper, and a temperature controller. The Homestead 24 is a different animal. It's a 24-inch heavy-duty charcoal grill in black - a steel firebox, a hinged lid, an adjustable charcoal tray, dampers on both the body and lid, and a cart with side shelves. Lighting is by chimney starter or firelighter, not by a glow plug.
That distinction drives everything that follows: no electrical connections to inspect, no firmware, no hopper clean-out. What you tune is airflow.
No manual PDF link is invented here. For the current document, go to the Oakford Homestead 24 product page, check the product-info tab, and if the file isn't there, request it via Nexgrill Support with your rating-plate number in hand.
Before You Download: What the Manual Actually Covers (and What It Doesn't)
A typical charcoal-grill manual covers three things well: hardware identification, assembly order, and lighting/safety warnings. It rarely covers the skills that actually make food good - damper tuning, two-zone banking, or ash management cadence. Those are learned, and the sections below are where this walkthrough earns its place.
What you should expect the manual to include: an exploded parts diagram with hardware callouts, torque-adjacent guidance (usually "snug, don't overtighten"), a warning about not using lighter fluid on hot coals, and a statement that the grill is for outdoor use only. What it usually omits: how long the first burn should last, and how to set dampers for 225°F versus 450°F.
Parts List and Hardware Checklist
Lay every part on a clean sheet before you touch a tool. Inventory gaps found before assembly are a phone call; gaps found mid-build are a stall.
| Component | What to Confirm | Typical Hardware |
|---|---|---|
| Cart legs and crossbars | Four legs, one lower shelf, wheel axle pair | M6 bolts, washers, lock nuts |
| Firebox bowl | No dents at lid hinge points | Bolts to cart brackets |
| Ash pan / charcoal tray | Adjustment lever moves freely | Pre-attached on most units |
| Cooking grate (hinged) | Hinge pin present, both halves seat flush | Drop-in, no hardware |
| Side shelves (2) | Bracket orientation left vs. right | M6 bolts plus washers |
| Lid thermometer | Bezel and nut included | Wing nut, often pre-fitted |
Sort hardware into muffin-tin cups by type. Mixing M6 and M5 bolts mid-build is the single most common cause of stripped threads on charcoal grills.
How to Assemble the Oakford Homestead 24 in the Right Order
Order is not arbitrary. Build the stable base first, then add mass to it, then close the top. Reversing steps 1 and 2 means lifting a loaded firebox onto a wobbly cart.
Step 1 - Sort Hardware and Stage the Cart
Flip the cart upside down on cardboard so you're not fighting gravity. Attach the lower shelf between the legs, then the axle and wheels on the rear legs. Leave every bolt finger-tight - about two threads engaged. This is the step where experienced builders deliberately do not reach for the wrench.
Step 2 - Mount the Firebox and Ash Pan Correctly
Right the cart with a helper. Set the firebox bowl onto the cart brackets, aligning the front damper opening with the lever slot. Confirm the ash pan slides in and out without binding before you tighten anything to the bowl. If the pan catches, the bowl is rotated slightly - loosen and rotate 5 degrees.
Step 3 - Install Grates, Side Shelves, and Lid Thermometer
Drop the hinged grate in; it should sit flush on all four rest points with no rock. Attach the shelves using the bracket orientation noted in the parts diagram - the left and right brackets are not interchangeable on most units. Thread the thermometer stem through the lid, seat the bezel, and snug the wing nut by hand plus a quarter turn.
Step 4 - Square the Frame Before Final Tightening
With everything assembled but loose, push the cart diagonally on a flat surface until all four wheels touch evenly. Then tighten in a cross pattern - front-left, rear-right, front-right, rear-left - and recheck for wobble. A frame squared at this stage stays square for years.
First Burn-Off: Why You Shouldn't Cook on It Straight Away
Factory oils, machining residue, and paint cure volatiles sit on every new grill. A burn-off at roughly 350-400°F for 30-45 minutes with the lid closed drives them off. Expect a light haze and a faint smell - both normal, both reasons to do this outdoors and away from doorways. Once the smoke clears and the lid thermometer settles, let the grill cool fully and wipe the grates with a lightly oiled cloth. Your first cook happens tomorrow, not tonight.
Try Comparing Two Products Side by Side Below to See Which Fits Best
If you're still deciding between the Homestead 24 and a neighbouring model - a gas four-burner, a flat-top griddle, or a pellet smoker - the comparison tool below lets you stack specs, cooking surface, and fuel type directly. It's a faster route than reading three spec sheets and trying to hold them in your head.
Once You've Weighed Two Options Against Each Other, Here's What Else Matters
Spec-to-spec comparison settles which grill you buy. Living with it settles whether you bought well. On a charcoal unit like the Homestead 24, the daily reality is airflow management, ash handling, and fuel cost - three things no spec sheet quantifies well. A 10-lb bag of briquettes runs roughly $8-$14 at U.S. retail depending on brand, and a typical 45-minute cook for four people consumes about 1.5-2 lbs banked to one side. Eight-to-ten cooks per bag is a reasonable planning figure.
The rest comes down to learning your dampers. That skill transfers to every future charcoal grill you own.
How to Control Temperature with the Homestead 24's Dampers
Charcoal temperature is not set by a dial - it's set by how much oxygen reaches the coals. The Homestead 24 has two damper systems and they do different jobs.
Bottom Vent vs. Lid Vent: What Each Does
The bottom vent is the intake. Closing it starves the fire; opening it feeds oxygen. The lid vent is the exhaust. It should stay open most of the time - a closed lid vent traps smoke and creates creosote-tasting food. Choking the fire should happen at the bottom, not the top.
| Target | Bottom Vent | Lid Vent | Charcoal Load |
|---|---|---|---|
| 225-250°F (low & slow) | 1/4 open | Half open | 1/2 chimney, banked one side |
| 300-350°F (roasting) | Half open | Half open | 3/4 chimney, split zones |
| 400-450°F (searing) | Fully open | Fully open | Full chimney, all coals together |
Two-Zone Setup for Indirect Cooking
Light a full chimney. When the top coals are greyed with ash, pour them against one side of the charcoal tray and leave the other side empty. Sear over the coals, then move proteins to the empty side, close the lid, and let the ambient heat finish the job. For a whole chicken or a rack of ribs, this is the layout that produces barbecue texture rather than charred exterior and raw interior.
Give your dampers 8-10 minutes to settle before adjusting again. Rapid tweaking overshoots every time - the lid thermometer lags the fire by several minutes.
The Five Mistakes New Charcoal Grill Owners Make (and How to Avoid Them)
These five appear in a disproportionate share of first-week support calls and forum threads. All five are avoidable.
Mistake 1 - Over-Tightening Bolts Before the Frame Is Square
Bolts tightened before squaring lock the frame into whatever geometry it was in at the time. Result: a rocking cart that never quite settles flat. Leave everything finger-tight until the diagonals are even.
Mistake 2 - Skipping the First Burn-Off
Cooking on factory oils transfers an unpleasant flavour to the first meal and, in some cases, a sticky film that takes two scrubs to remove. Thirty minutes of empty-grill heat prevents both.
Mistake 3 - Running Both Dampers Wide Open (or Both Shut)
Both open means a runaway fire and burnt food within minutes. Both shut means coals smoulder and produce acrid smoke. Bottom controls the fire; the lid vent stays partially open to keep the airflow moving.
Mistake 4 - Leaving Ash in the Pan
Ash insulates and blocks the intake. Empty it after every second cook - after the grill has fully cooled, never while warm. A clogged pan is the most common reason a veteran grill owner can't reach temperature.
Mistake 5 - Storing Uncovered
Rain pooling in the ash pan accelerates corrosion from the inside out. Even under a patio roof, a fitted cover reduces UV and moisture exposure. Check the product page for the model-matched cover.
Your Pre-Cook Checklist
- Frame square, all bolts tight, no wobble
- Burn-off complete and grill cooled
- Ash pan empty and sliding freely
- Chimney starter filled with fresh briquettes
- Bottom vent set for target temperature (see table above)
- Lid vent at least half open
- Instant-read thermometer within arm's reach
When to Request a Replacement Part
Cosmetic paint scuffs on the firebox exterior are normal and typically not covered. Structural issues - a bent cart leg, a grate that won't seat flush, a missing hinge pin, a thermometer that never moves - are worth a support request. Photograph the affected part alongside the rating-plate label, describe the part name as it appears in the parts diagram, and submit via Nexgrill Support. Having the model number photographed saves a round trip.
For general outdoor charcoal safety context, the U.S. Consumer Product Safety Commission and the National Fire Protection Association both publish guidance on grill placement, clearance from structures, and supervision - useful reading for any new charcoal owner, regardless of brand.